CRUD in Sails: A Beginner's Tutorial
Learn the Basics of CRUD and How to Implement It in Sails

I am a Nigerian full-stack developer. Having used Python (Django) for web development and algorithm writing for more than two years. Additionally, I use Sails.js while creating web applications. Vue.js is what I use for my front-end. I enjoy using my knowledge to improve and simplify situations, and I am eager to learn new things. I'm on a mission to develop my competence.
In this article, we are going to build a simple CRUD API using Sails, an MVC framework for Node. We will be building endpoints for the following features:
Create articles
Read all articles
Read a single article
Update an article
Delete an article
We will use ThunderClient to test our endpoints. Why? This way, we can build and test our endpoints without having to leave Visual Studio Code. Feel free to use Postman or any other IDE of your choice.
Another extension we can install to make building much easier is MantaSails, a Visual Studio Code snippet extension for Sails. By the end of this tutorial, you will have a working knowledge of how to create CRUD applications with Sails.
Much of Sails conventional practices are not going to be applied for the sake of beginners, but as we progress, we will get familiar with them.
Let's get started.
Prerequisites
This tutorial assumes that the reader already has some knowledge of Node and server-side programming.
What is Sails?
Sails is a web framework, not in the same terms as React and Vue, but unique in its form. It is a backend framework that helps you build APIs, and serve HTML files, and it can handle hundreds of thousands of simultaneous users. Think of Sails on the same playing field as you would with Ruby, Laravel, and Django.
"Sails.js or Sails is a real-time MVC framework for building production-ready enterprise Node.js applications." - Kelvin O. Omereshone, Lead maintainer of Sails
Head to this article to learn about the features of Sails.
Preparing the environment
Before we get right into building the CRUD API, we need to have the Sails CLI installed on our machine. To get that done, run the command below:
I assume you already have Node installed and working.
npm install -g sails
Once you run that command, the Sails CLI should be installed globally on your machine. To verify the installation, you can run this:
sails -v
This will return the latest version of Sails CLI.
Perhaps you have installed Sails CLI in the past, here is the command to upgrade:
npm install -g sails@latest
Now that we have the Sails CLI on our machines, let us proceed to set up our project.
Get the Sails application ready
One interesting feature of the Sails CLI tool is that it can create a new application for you and also install the dependencies right on the spot. To get started, you need to run the sails new command, passing in the name of your application as an argument. Like this:
sails new <appname>
Another interesting feature is that the sails new command can also take an optional flag. We can use the --no-frontend flag to generate just enough files to get started on developing an API.
So let's run the command, adding the optional flag.
sails new articles-api --no-frontend
Tip: If you want to install the dependencies later or if you want to see what dependencies are being installed, you can add
--fastas a flag.
From your terminal, you can cd into the newly created directory articles-api . Then use code . to open Visual Studio Code in the current directory. You can also open the directory with any IDE of your choice.
Remember to install the optional tools: MantaSails and ThunderClient from the Visual Studio Code marketplace.
Let's get to understanding the project structure.
Anatomy of the application
The screenshot below explains the anatomy of the application and what each directory is meant for.
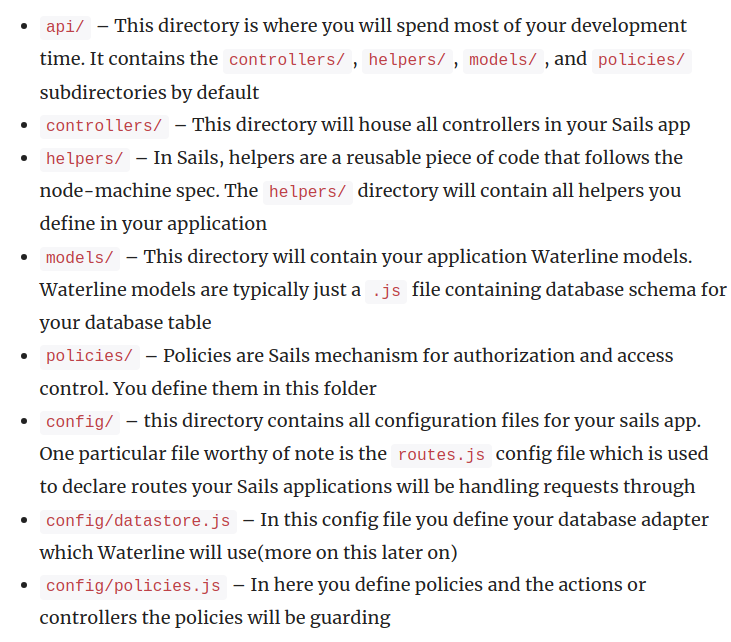
This is the source. To understand more, you can find full details on the sails docs.
However, since this article is for beginners, we will not necessarily touch on every point, just what we need to get to our target.
Let's run the app!
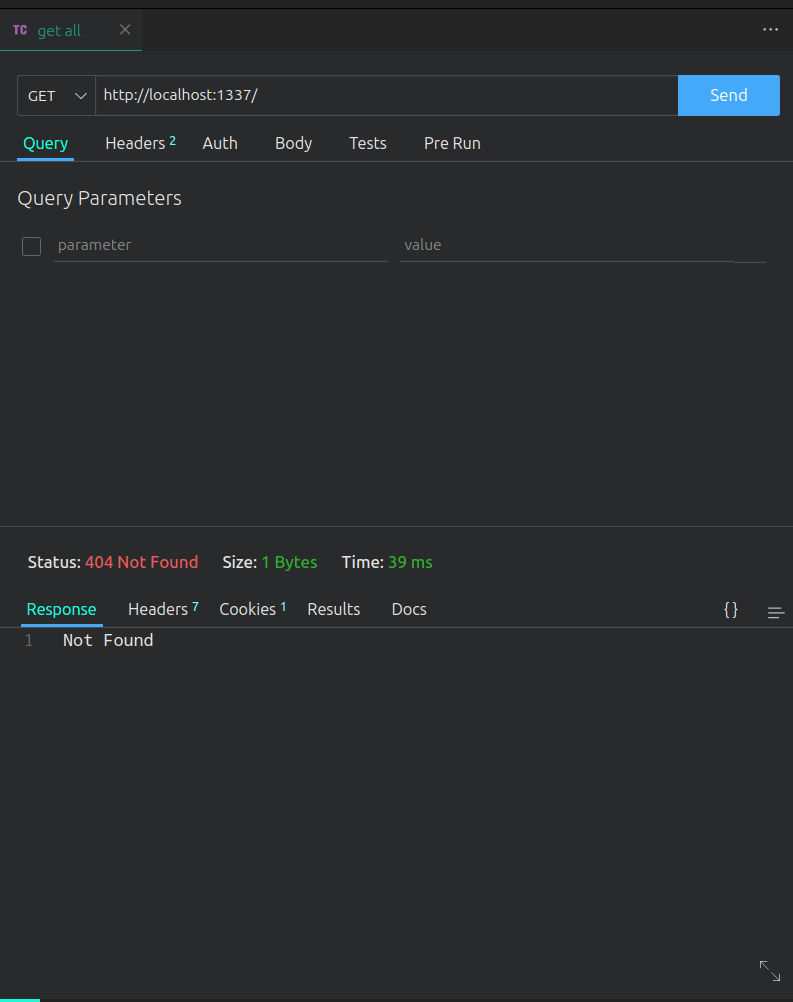
Now that our environment is set, we can run it by using sails lift or sails l. Once the Sails server begins, you will find at the bottom of the CLI your local URL, which you can click on or copy and paste into your browser or your API tool of choice.
Tip: You can freely use any port of your choice by running
sails lift --port <portno>
Yes! It works! Although, we have a 404 status and Not Found staring at us. It happened because we have not defined any routes yet.
To create our first endpoint, we head over to config/route.js which will hold all our endpoints. It is easy to set up an endpoint, the structure is:
The verb of choice (GET|POST|PATCH|DELETE)
The URL path
The path of the action that the endpoint points to
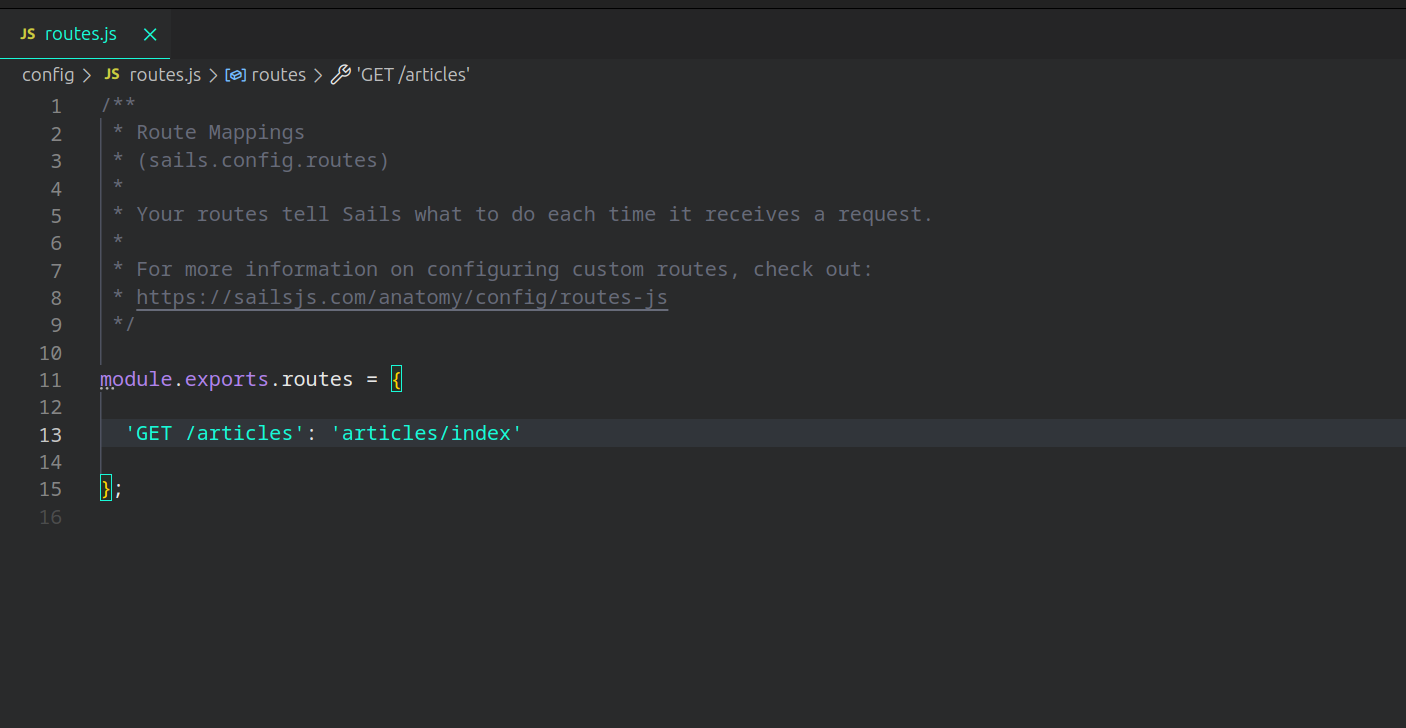
Once all this is gathered, it is to be structured like this:
'GET /articles': 'articles/index'
What this means is that when you send a GET request to http://localhost:3000/articles/, the action articles/index.js is going to carry out its operation and return a response.
Tip: Sails provide the flexibility of separting your controller action from your route. This will help to ensure more readability of your controller actions.
Your route.js file should look like this:
Now that we are done with this phase, the next step is to define our controller action. To do that, we make use of the generate command on the Sails CLI. This will help us generate a template file to work on. Here's the command:
sails generate action articles/index
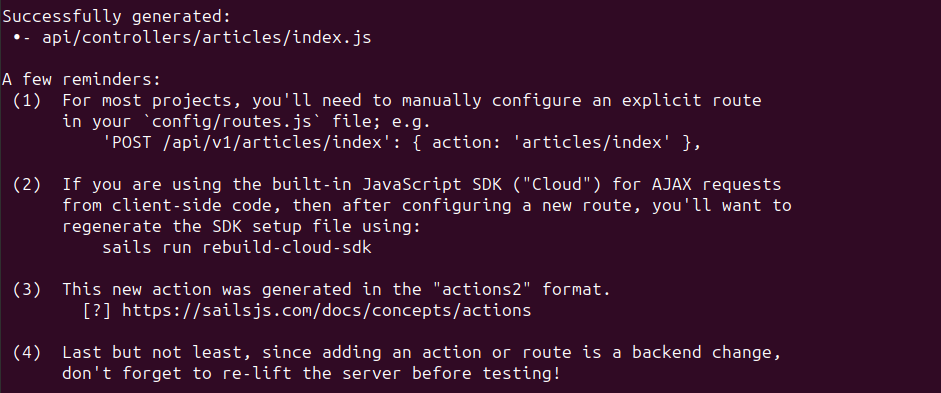
Observe that the api/controller directory has been updated. Look closely; a file extension was added to the index file. That is because Sails is smart enough to do that automatically, so there is no need for you to do so.
Let's get right to the index.js file. See how Sails has everything arranged!
I will explain each part of the file soon enough, but for now, let us return something simple.
module.exports = {
  friendlyName: 'Index',
  description: 'Index home.',
  inputs: {
  },
  exits: {
  },
  fn: async function (_, exits) {
    // All done.
    return "Hey, It works!";
  }
};
Therefore, if you head to http://localhost:1337/articles/ , you will get the response you just returned above.
If you missed anything, here's a clip to help.
Our first article
So far, we have only covered VC out of MVC. Let's talk about the M. We need to store our articles somewhere for when we create them and when we need to see them.
Let's create our first model. Just like generating actions, we can do the same for models with the CLI tool.
sails generate model articles
Navigate to api/models, you will see the new file that has been generated by Sails. This is where we define the fields we want our article to possess. We want:
Author
Title
Body
Sails come with an ORM called waterline. This ORM is so flexible that you don't need to bother about DB to use until you are ready for production.
NB: I will be starting an article series soon where I discuss different parts of Sails. Stay tuned to the series.
Let's define our fields in the model.
module.exports = {
  attributes: {
    author: {
      type: 'string',
      required: true,
      maxLength: 30
    },
    title: {
      type: 'string',
      required: true,
      maxLength: 60
    },
    body: {
      type: 'string',
      required: true
    }
  },
};
Tip: To use MantaSails to define a specific attribute, you just have to type
sattrand hitenter, it will provide you with a snippet to work with. Also, check the table on the readme for more.
Attributes are pieces of a model, similar to columns in a particular table. This means that author, title, and body are attributes under a model Articles.
Observe closely, each attribute has type and required. These are known as validations in the waterline ORM.
Since the model is prepared, the next thing to do is set up a controller action that will be used to create the articles. Run the command below:
sails generate action articles/create
What the command above will do is create a new file in the api/controller/articles directory. Now the next thing is to define inputs. These are fields that we expect to receive from the user. We can directly unpack it or pass it in as a single variable. Just like this:
  fn: async function ({author, title, body}) {
    return;
  }
// OR
  fn: async function (inputs) {
    console.log(inputs.author)
    return;
  }
Seems confusing? Let's put this to the test and see how it works. What we are about to do is set up our inputs and use those inputs to create an article.
module.exports = {
  friendlyName: 'Create',
  description: 'Create articles.',
  inputs: {
    author: {
      type: 'string',
      required: true,
    },
    title: {
      type: 'string',
      required: true,
    },
    body: {
      type: 'string',
      required: true,
    }
  },
  exits: {},
  fn: async function ({author, title, body}) {
    let articleRecord = await Articles.create({
      author, title, body
     }).fetch();
    return articleRecord;
  }
};
Tip: Scroll to the top of the file to make sure that
Articleswas not imported. If it was, make sure to delete it. Sails handle most of our file imports for us.Tip: Using MantaSails, to create an article, type
cofthen hitenter.
Now that we have set up our controller action, the next step is to tailor the route to that controller. Add this to your routes.js.
...
    'POST /articles': 'articles/create',
...
Before you lift your Sails app, head to config/models.js. You will observe that there are comments explaining what to do and what you can do. The first thing to note is the default attributes that Sails has provided for us.

These attributes are added to our models by default, of course, you can comment them out if you don't want, but since we are working on something simple, we are just going to leave them that way.
The next thing to note is:

Now Sails comes with three migration strategies
safe: never auto-migrate my database(s). I will do it myself, by hand.
alter: auto-migrate columns/fields, but attempt to keep my existing data (experimental).
drop: wipe/drop ALL my data and rebuild models every time I lift Sails.
Since we are in development, we will stick to using alter. Run the sails l command so we can test our newly created endpoint.
You can send this as input:
{
  "author": "Lennox",
  "title": "This is a title",
  "body": "This is a body"
}
Then you will receive this as an output:
{
  "createdAt": 1689002196510,
  "updatedAt": 1689002196510,
  "id": 1,
  "author": "Lennox",
  "title": "This is a title",
  "body": "This is a body"
}
As you can see, those default attributes do come in handy.
Let's fetch the articles
You can add more articles if you wish to test out the endpoint. So how can we fetch all created articles? We will find out in this section.
What we have to do is modify the api/controller/articles/index.js, we fetch all articles from the DB and then return them to the user.
...
    let articleRecords = await Articles.find({});
    return articleRecords;
...
Tip: Using MantaSails, you can simply type
fand thenenterto generate a snippet.Tip: Don't forget to re-lift your Sails app.
View a single article
To fetch a particular article, we have to pass the id of the chosen article to a controller action that will use the id to query the DB and return the requested article.
To do that, we need to generate an action and then configure a new route:
sails generate action articles/single
...
    'GET /articles/:id': 'articles/single'
...
module.exports = {
  friendlyName: 'Single',
  description: 'Single articles.',
  inputs: {},
  exits: {},
  fn: async function (inputs) {
    let articleRecord = await Articles.findOne({ id: this.req.params.id });
    if (!articleRecord) {
      sails.log('Could not find article');
      return this.res.status(404).json({ message: `Article with id: ${this.req.params.id} not found`});
    }
    // All done.
    return articleRecord;
  }
};
Update an article
Updating an article is quite similar to viewing a single article, we will pass the id of the article as a request parameter, and then the controller action will handle the rest.
Let's get that done.
sails generate action articles/update
...
    'PATCH /articles/:id': 'articles/update'
...
module.exports = {
  friendlyName: 'Update',
  description: 'Update articles.',
  inputs: {
    author: {
      type: 'string',
      required: true
    },
    title: {
      type: 'string',
      required: true
    },
    body: {
      type: 'string',
      required: true
    }
  },
  exits: {},
  fn: async function ({author, title, body}) {
    let articleRecord = await Articles.updateOne({ id: this.req.params.id })
    .set({ author, title, body });
    // All done.
    return articleRecord;
  }
};
Tip: Using MantaSails, all you have to do to updatean article is to type
urand hitenter. You can fill the gaps from there.
Delete an article
Just like in the previous section, we will also pass the id of the article to carry out this action.
Let's get that done.
sails generate action articles/delete
...
    'DELETE /articles/:id': 'articles/delete'
...
module.exports = {
  friendlyName: 'Delete',
  description: 'Delete articles.',
  inputs: {},
  exits: {},
  fn: async function (inputs) {
    await Articles.destroyOne({ id: this.req.params.id });
    // All done.
    return {message: `Item with id: ${this.req.params.id} successfully deleted`};
  }
};
Tip: Using MantaSails, type
drand hitenter
It's a wrap!
In this article, we were able to discuss Sails and also set up endpoints to perform CRUD operations.
In subsequent articles, we will be exploring more of Sails and building more complex projects. Do stick around.
Connect with me on Twitter and leave a comment with your thoughts or suggestions.
Until next time, remember ...
"When building something, think about elegance." - Evan You
